Exploring Firecracker MicroVMs for Multi-Tenant Dagger CI/CD Pipelines
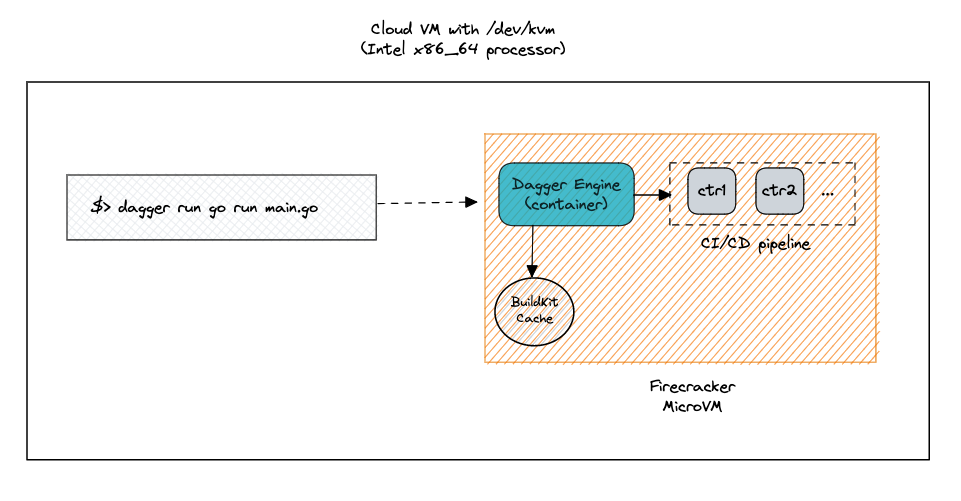
I've been experimenting with the feasibility of running Dagger CI/CD pipelines isolated from each other using Firecracker microVMs to provide a strong security model in a multi-tenant scenario. When customer A runs a pipeline, their containers are executed in an isolated environment.

During the past few days, I've been experimenting with the feasibility of running Dagger CI/CD pipelines isolated from each other using Firecracker microVMs to provide a strong security model in a multi-tenant scenario. The idea is that, when customer A runs a pipeline, their containers are executed in an isolated environment - a microVM with its own kernel - completely separated from other customers' pipelines.
This blog post is about my first hands-on experience and the challenges I faced when setting up a Firecracker microVM with all the dependencies needed to have the Dagger engine up & running.
What is Firecracker and why should you care?
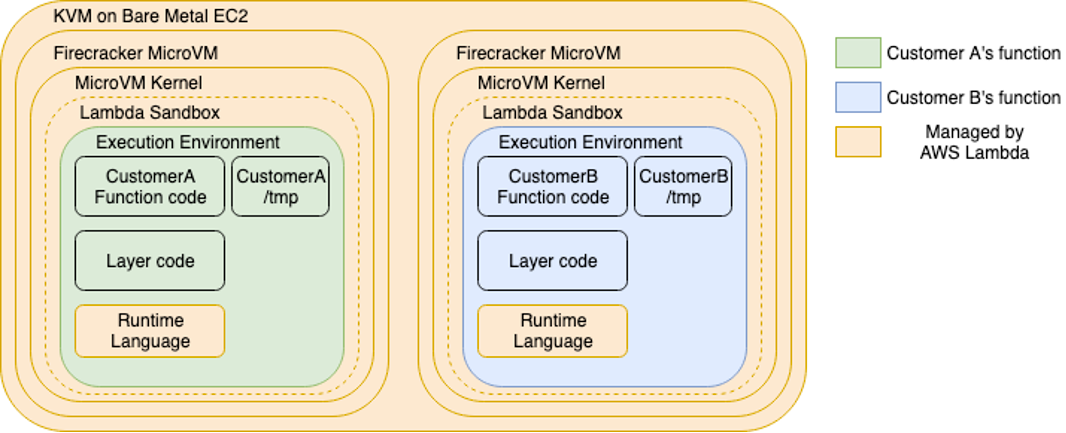
Firecracker is an open-source project by AWS that was released in November 2018 to run AWS Lambda functions for multiple customers in a secure way. Firecracker microVMs aim to provide the best of both worlds: the security of virtual machines with the efficiency and fast start-up of containers.
Provisioning the infrastructure
First of all, Firecracker doesn't run anywhere. You need a Linux machine with KVM (Kernel-based Virtual Machine) which is the technology that allows you to run a virtual machine in Linux.
As I don't have one, I had to choose between the following 2 options:
- Buy a dedicated bare-metal Linux server: Hetzner provides relatively cheap hardware compared to other big cloud providers such as AWS. For instance, an Intel i5-13500 w/ 64GB RAM would "only" cost 53EUR + once-off setup fee of 47EUR.
- Create a cloud VM that supports nested virtualization.
Check out further options here.
Given that this is a project for learning and experimenting, I went for the latter and manually provisioned a basic DigitalOcean droplet based on Debian 11 with 2 vCPUs and 4 GB RAM ($0.036/hour, $ 24/mo).
curl -X POST -H 'Content-Type: application/json' \
    -H 'Authorization: Bearer '$TOKEN'' \
    -d '{"name":"debian-s-2vcpu-4gb-fra1-01",
        "size":"s-2vcpu-4gb",
        "region":"fra1",
        "image":"debian-11-x64",
        "vpc_uuid":"eed6ff7d-cca6-40ad-8a2c-e1c3d85930ef"}' \
    "https://api.digitalocean.com/v2/droplets"
Kernel and rootfs setup
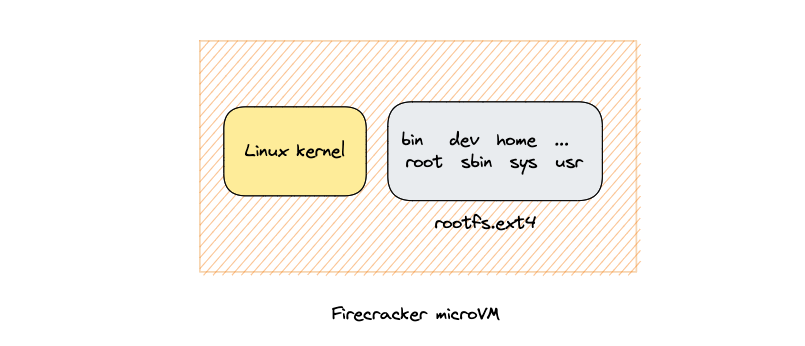
A Firecracker microVM needs two pieces to run: a Linux kernel binary and a rootfs:
Creating a custom kernel image with specific modules
Firecracker provides a ready-to-use kernel image binary and a rootfs hosted in AWS S3 here. However, when trying to run the Dagger engine as an OCI container image in the microVM, I realized that the default Firecracker kernel config was missing some modules that are required to run containers, such as nftables:
iptables -V
iptables/1.8.7 Failed to initialize nft: Protocol not supported
I learned the hard way that Firecracker's guest configurations do not allow for loadable modules. Apparently, for performance purposes, the modules need to be statically compiled into the kernel instead of loaded dynamically.
So, how did I compile a set of modules into the kernel? There's a kernel configuration file where I had to swap the use of modules (setting=M) to be built-in (setting=Y). The resulting kernel will include that functionality built-in. Thanks to Hugo Santos for the direction:
In your kernel configuration you can swap the use of modules (setting=M) to be builtin (setting=Y) and the resulting kernel will have that functionality built-in, no modules needed! You’ll only need a vmlinux. So no need to copying to rootfs either.
— Hugo Santos (@20thr) May 18, 2023
So, what base kernel configuration did I use? I downloaded microvm-kernel-x86_64-5.10.config and set the modules specified below to be built-in to the kernel. Then, I proceeded to build the kernel pointing to this new config.
I used the devtool provided by Firecracker to proceed to build the kernel targeting this new config. This tool is very convenient because it builds the Linux kernel using a development container with all the tooling needed (gcc, flex, bison, etc), so you only need to have Docker installed.
# Download the base kernel config
BASE_KERNEL_CONFIG="microvm-kernel-x86_64-5.10.config"
wget https://raw.githubusercontent.com/firecracker-microvm/firecracker/main/resources/guest_configs/$BASE_KERNEL_CONFIG

# Clone the Firecracker repo which contains the devtool to build the Linux kernel
git clone https://github.com/firecracker-microvm/firecracker.git --depth 1
cp $BASE_KERNEL_CONFIG ./firecracker/.config
cd firecracker

# Set which modules to compile into the kernel
sed -i 's/^# CONFIG_IP6_NF_IPTABLES=.*/CONFIG_IP6_NF_IPTABLES=y/' .config
sed -i 's/^# CONFIG_NETFILTER_XT_MARK.*/CONFIG_NETFILTER_XT_MARK=y/' .config
sed -i 's/^# CONFIG_NETFILTER_XT_MATCH_COMMENT.*/CONFIG_NETFILTER_XT_MATCH_COMMENT=y/' .config
sed -i 's/^# CONFIG_NETFILTER_XT_MATCH_MULTIPORT.*/CONFIG_NETFILTER_XT_MATCH_MULTIPORT=y/' .config
sed -i 's/^# CONFIG_CRYPTO_CRC32_PCLMUL.*/CONFIG_CRYPTO_CRC32_PCLMUL=y/' .config
sed -i 's/^# CONFIG_CRYPTO_CRC32C_INTEL.*/CONFIG_CRYPTO_CRC32C_INTEL=y/' .config
sed -i 's/^# CONFIG_CRYPTO_GHASH_CLMUL_NI_INTEL.*/CONFIG_CRYPTO_GHASH_CLMUL_NI_INTEL=y/' .config
sed -i 's/^# CONFIG_CRYPTO_AES_NI_INTEL.*/CONFIG_CRYPTO_AES_NI_INTEL=y/' .config
sed -i 's/^# CONFIG_CRYPTO_CRYPTD.*/CONFIG_CRYPTO_CRYPTD=y/' .config
sed -i 's/^# CONFIG_INPUT_EVDEV.*/CONFIG_INPUT_EVDEV=y/' .config
sed -i 's/^# CONFIG_NET_SCH_FQ_CODEL.*/CONFIG_NET_SCH_FQ_CODEL=y/' .config
sed -i 's/^# CONFIG_AUTOFS4_FS.*/CONFIG_AUTOFS4_FS=y/' .config

# Build the Linux kernel pointing to the new config
./tools/devtool build_kernel -c ".config" -n 8
Script to include some modules into the Linux kernel and build it
After building the Linux kernel for 15-20 minutes approximately (this duration may depend on the resources of your cloud VM), the Linux kernel binary was available in ./build/kernel/linux-5.10/vmlinux-5.10-x86_64.bin.
Creating a custom rootfs image
To run the Dagger engine as an OCI container image, I had to build a custom root filesystem for the microVM using the following steps:
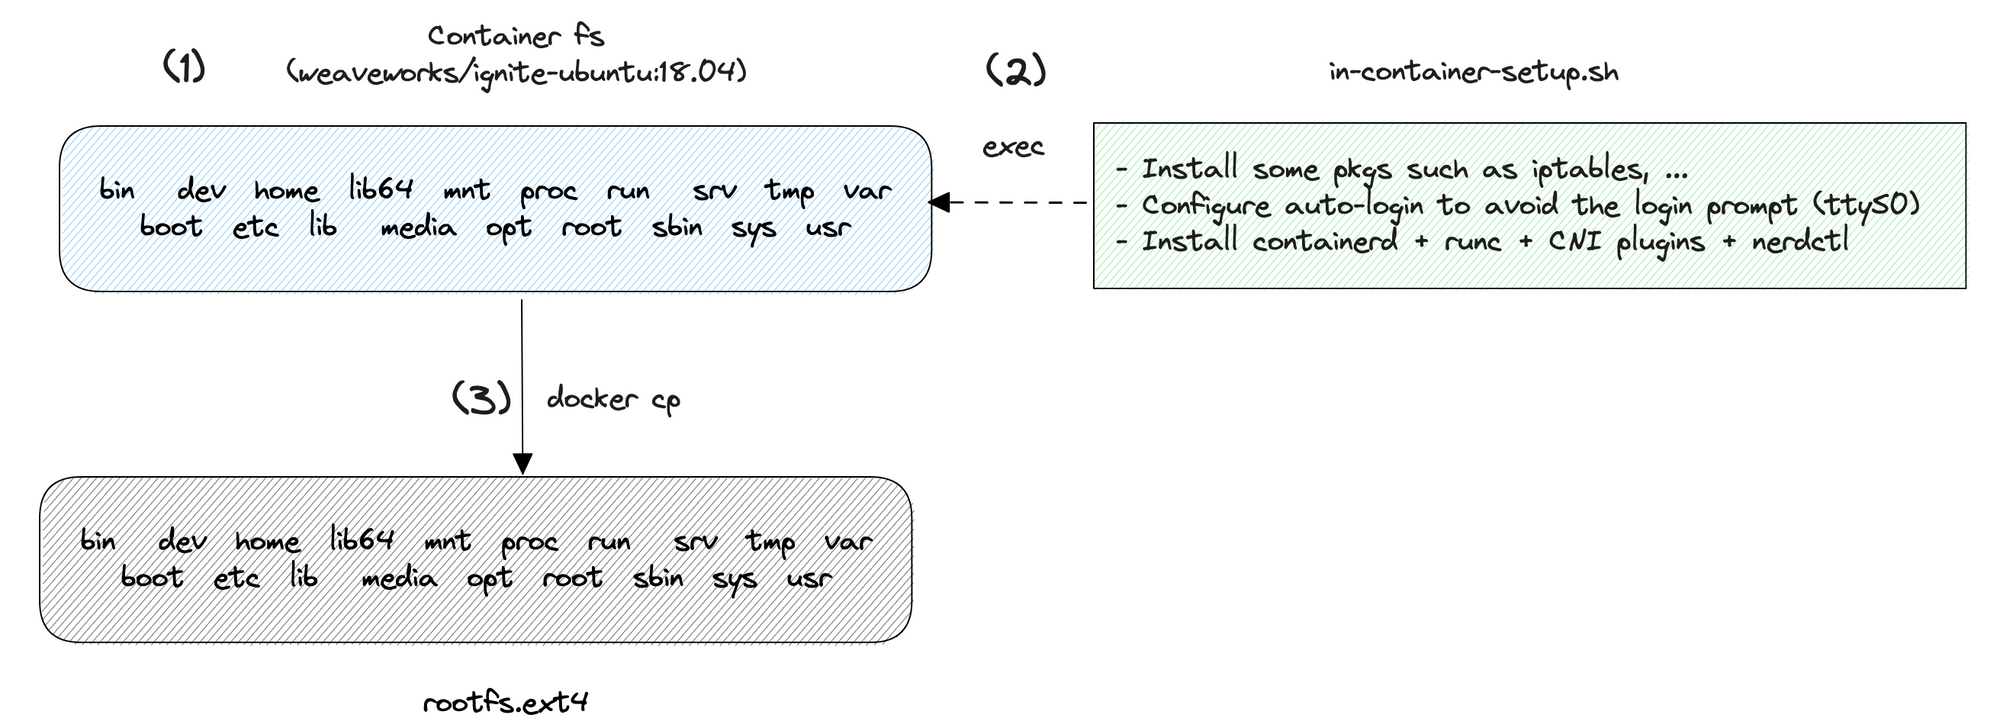
(1) I start a container from the image weaveworks/ignite-ubuntu:18.04. This image contains a set of packages that are required to boot a real VM, such as udev.
(2) A script is injected at container startup to install some additional packages such as iptables and set up auto-login to avoid the microVM asking for a username and password when it boots up. Finally, I also install containerd, runc, CNI plugins, and nerdctl to run the Dagger engine eventually.
Next, I create an unformatted disk image of considerable size that can be used as a block device. The disk image file is formatted with the ext4 file system, enabling it to store files and directories. Later, the file system is mounted in a path in the host, making its content (nothing yet) accessible at that specific mount point.
(3) Last, the root file system / of the container is copied over the mount point with docker cp. The file system is eventually unmounted with unmount, leaving the rootfs.ext4 ready to be used by the microVM.
# Image used as a base for the rootfs
IMG_ID=weaveworks/ignite-ubuntu:18.04
CONTAINER_NAME="ubuntu"

# The in-container-setup.sh script installs some pkgs,
# configures auto-login and installs containerd, runc, CNI plugins
# and nerdctl.
docker run --name $CONTAINER_NAME -h microvm -i $IMG_ID /bin/bash -s < in-container-setup.sh


MOUNTDIR=mnt
FS=rootfs.ext4
SIZE="7G"


# Create an ext4 filesystem and mount it in the host
qemu-img create -f raw $FS $SIZE
mkfs.ext4 $FS
mkdir -p $MOUNTDIR
mount $FS $MOUNTDIR

# Copy the container file system into the mount dir
docker start $CONTAINER_NAME
docker cp $CONTAINER_NAME:/ $MOUNTDIR
docker stop $CONTAINER_NAME
docker rm $CONTAINER_NAME

umount $MOUNTDIR
Script to build a custom rootfs
Setting up microVM internet access
Funnily enough, when I first booted up the microVM, I realized it didn't have Internet access by default.
In the cloud VM, I had run the following bash script which creates a TAP device named tap0. It behaves like a virtual Ethernet device and gets assigned the IP address 172.18.0.1 with a subnet mask of /24 to the tap0 interface, bringing it up to send and receive network traffic and enable ip forwarding.
The iptables commands set up forwarding rules in the firewall to allow traffic between the TAP device and the eth0 network interface.
# The following settings won't be persistent
# and will be reset after system reboot.

# change this per your local configuration
# e.g. eth0
BACKBONE=eth0

ip tuntap add tap0 mode tap
ip addr add 172.18.0.1/24 dev tap0
ip link set tap0 up
echo 1 > /proc/sys/net/ipv4/ip_forward
iptables -t nat -A POSTROUTING -o "$BACKBONE" -j MASQUERADE
iptables -A FORWARD -m conntrack --ctstate RELATED,ESTABLISHED -j ACCEPT
iptables -A FORWARD -i tap0 -o "$BACKBONE" -j ACCEPT
Launching the Firecracker microVM
At this point, I had everything I need to boot a Firecracker microVM: the kernel image binary and the rootfs image.
In the cloud VM, I downloaded the Firecracker binary from the last release available in the Firecracker GitHub repository and moved it to /usr/local/bin/firecracker:
curl -fSsL https://github.com/firecracker-microvm/firecracker/releases/download/v1.3.2/firecracker-v1.3.2-x86_64.tgz | tar -xz

mv release-v1.3.2-x86_64/firecracker-v1.3.2-x86_64 /usr/local/bin/firecracker
To launch the microVM, I have a small Go program that uses the Firecracker Go SDK. It basically consists of this piece of code. The most important part is setting right the configuration of how Firecracker is launched, such as the Firecracker binary, kernel, and rootfs path. In the example below, I also configure the number of CPUs, memory size of the microVM alongside the kernel args:
const (
	// How Firecracker is launched
	firecrackerPath = "/usr/local/bin/firecracker"
	kernelPath      = "./assets/vmlinux-5.10-x86_64.bin" "/root/firecracker-do/vmlinux-5.10-x86_64.bin" 4eea4f0c666b4d211b5b14736/boot/vmlinux-5.10.77"
	rootfsPath      = "./assets/rootfs.ext4"

	// Firecracker settings
	noCpus                 = 1
	memorySize             = 1024
	kernelArgs             = "ro console=ttyS0 reboot=k panic=1 pci=off nomodules ip=172.18.0.2::172.18.0.1:255.255.255.0::eth0:off"
)
Next, I run launch the microVM by running the Go program:
go run launcher.go --socket 1.sock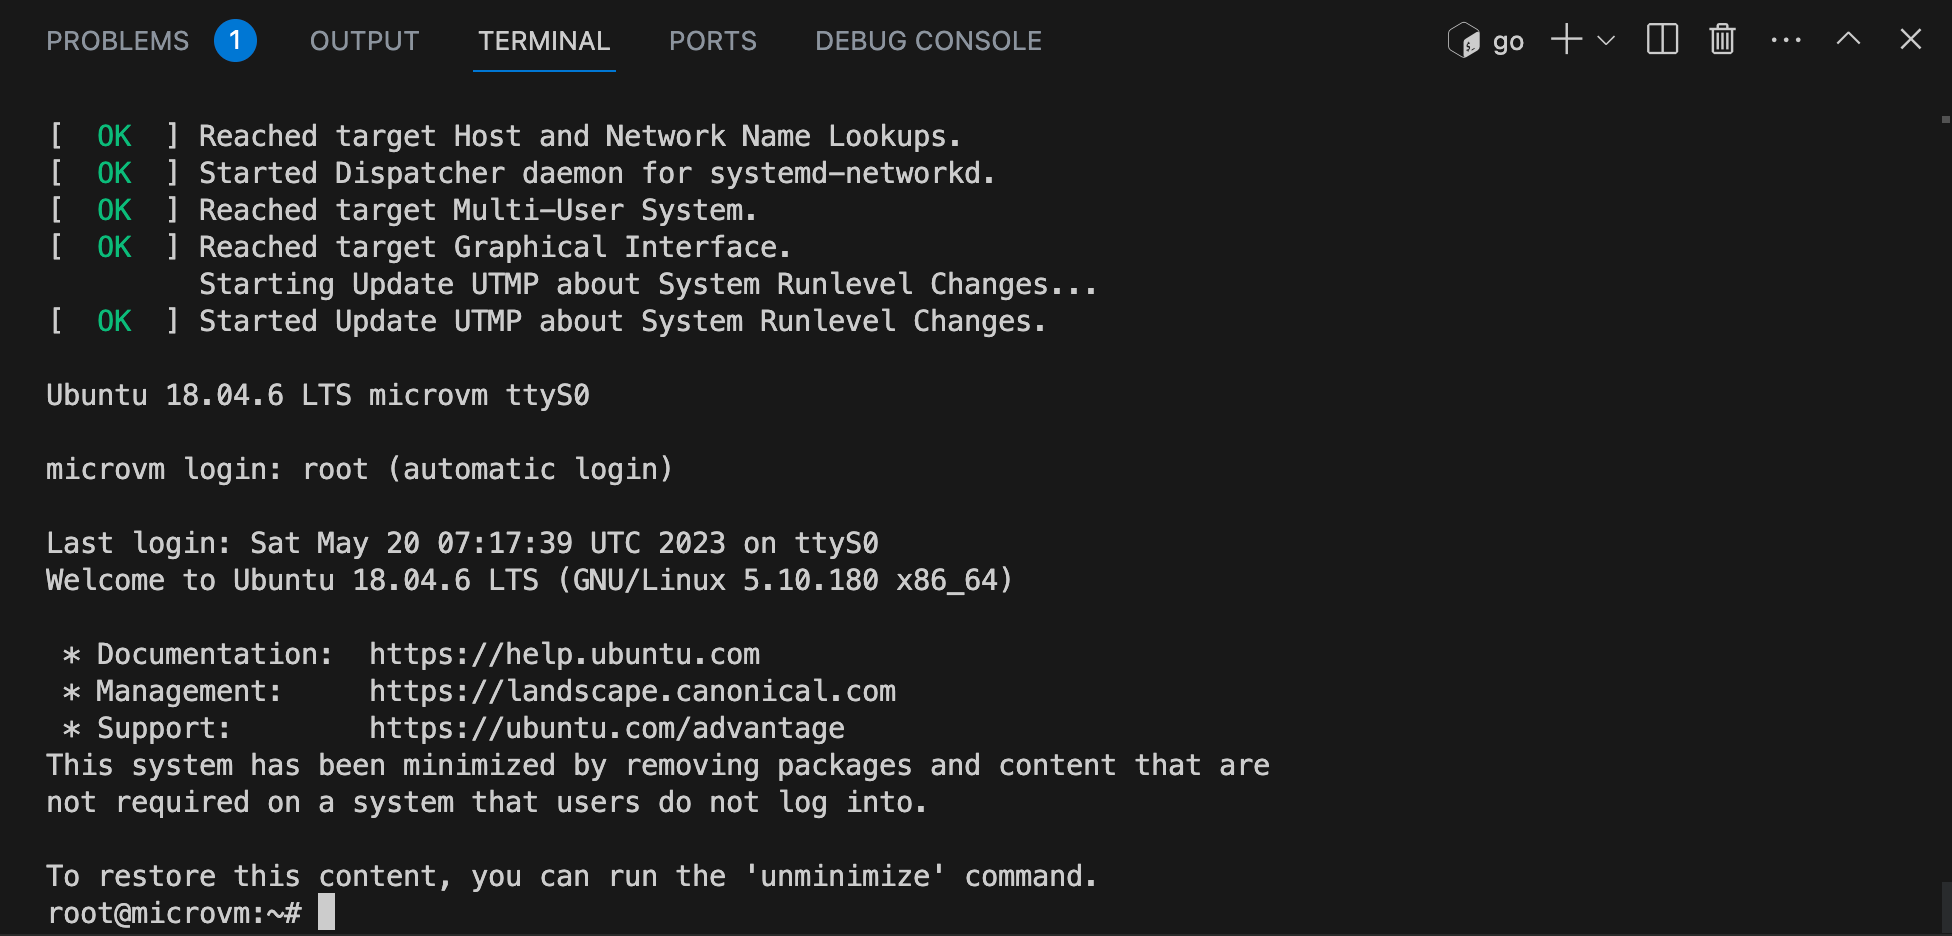
At this point, nearly everything is configured.
I realized I had to enable and start the containerd service using the systemd init system the first time the microVM boots:systemctl enable --now containerd.
What is the Dagger engine?
Dagger is a new way to develop your CI/CD pipelines as code and run them anywhere. Basically, you use your preferred language (Go, NodeJS, Python, ...) to develop how your pipeline should run, and Dagger will execute the pipeline as standard OCI containers.
The Dagger engine is a private fork of BuildKit that receives API requests from the SDK library, computes a DAG (Directed Acyclic Graph) of low-level operations required to compute the result, and starts processing operations concurrently: running your pipeline in containers by communicating with an OCI container runtime.
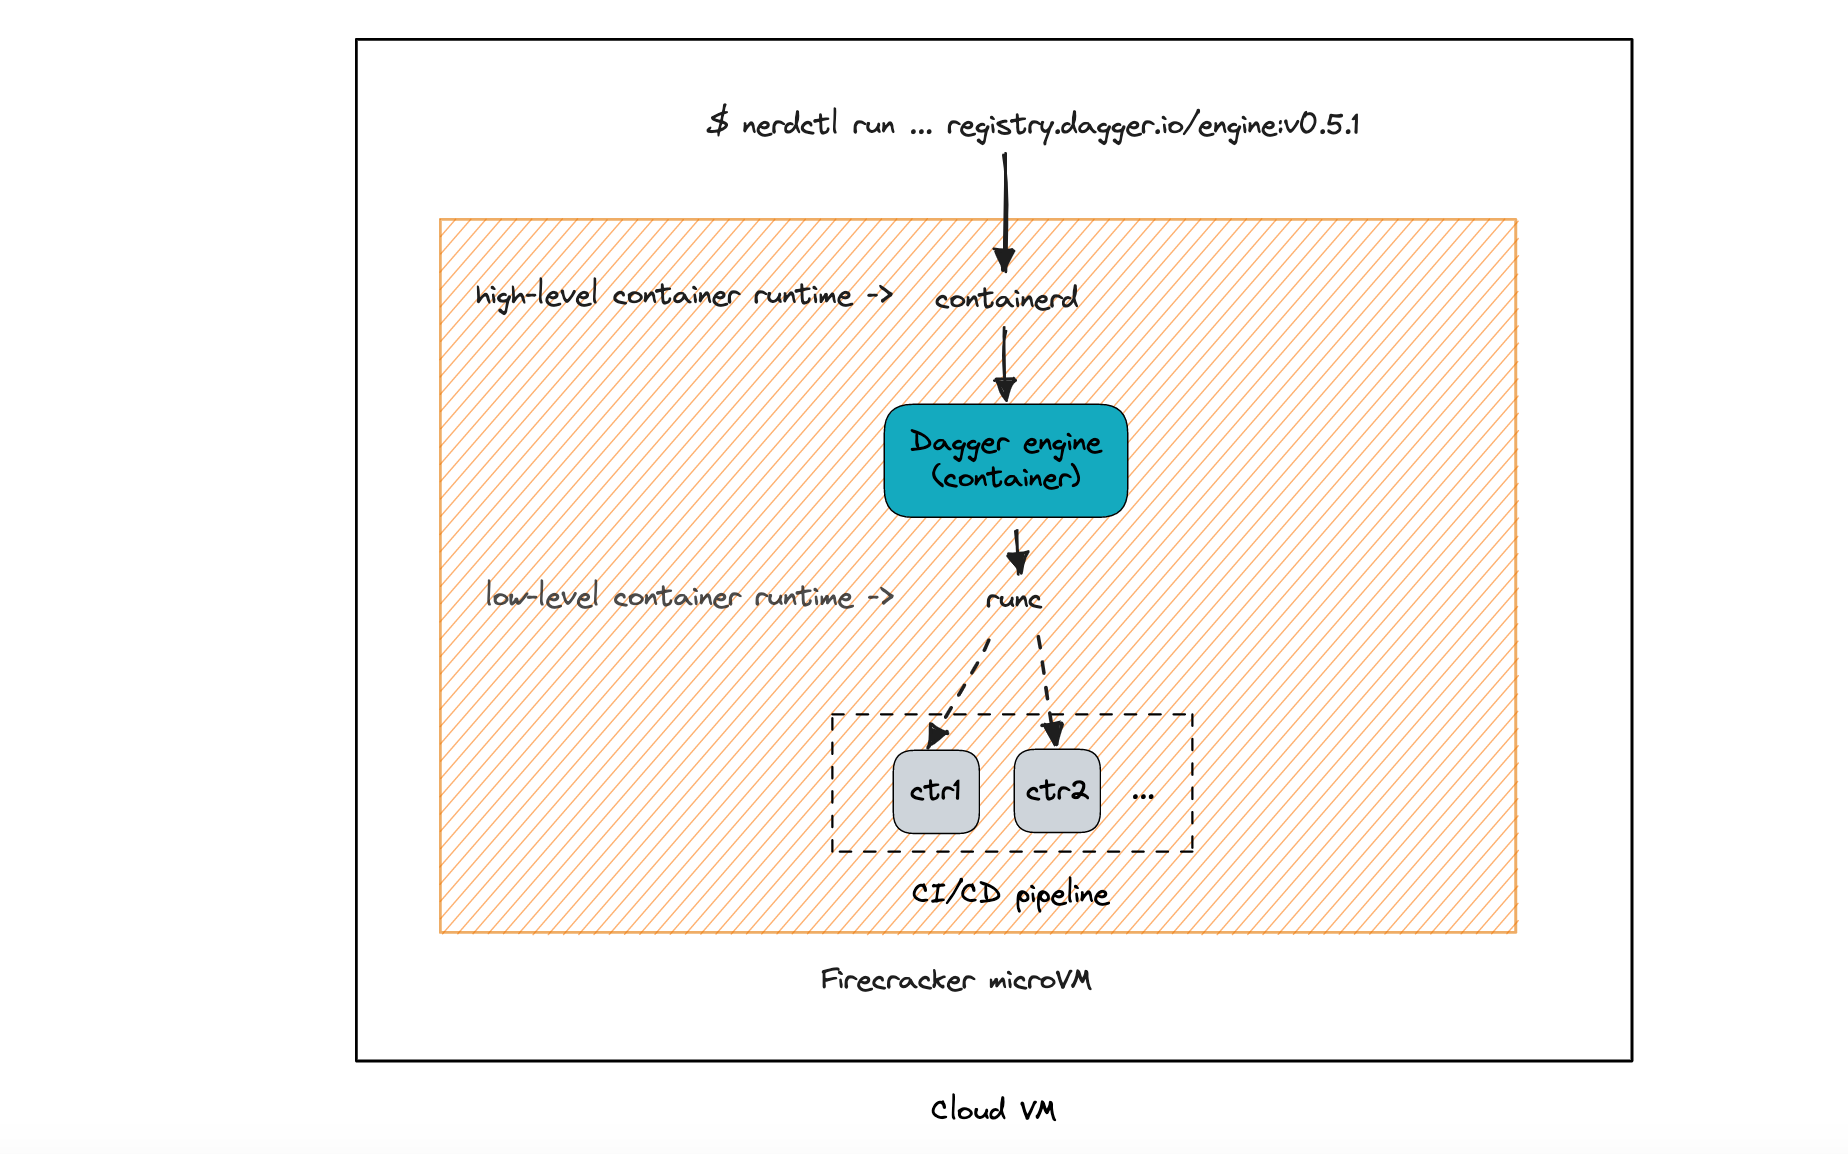
Running the engine
At the time of this writing, the engine is only distributed as an OCI container image. In order for it to run, it needs a high-level OCI container runtime like containerd and a low-level container runtime like runc, alongside the CNI plugins. All of this has previously been installed as part of the custom rootfs previously.
Before running the Dagger engine, we need to specify through a engine.toml file what is the address it should run on, e.g. tcp://0.0.0.0:1234. This file must be mounted at /etc/dagger when running the container. Also, I created a directory in the microVM at /root/dagger-data that is mounted at /var/lib/dagger in the container, which is the location where the engine will persist the cache.
# Specify the TCP address that the engine will run on
cat <<EOF > engine.toml
debug = true
insecure-entitlements = ["security.insecure"]
[grpc]
address = ["tcp://0.0.0.0:1234"]
EOF
# Create a directory in the cloud VM to persist the Dagger cache
mkdir -p dagger-data
# Run the Dagger engine as a container
nerdctl run --rm -it \
-v $(pwd):/etc/dagger \
-v $(pwd)/dagger-data:/var/lib/dagger \
--privileged \
-p 1234:1234 \
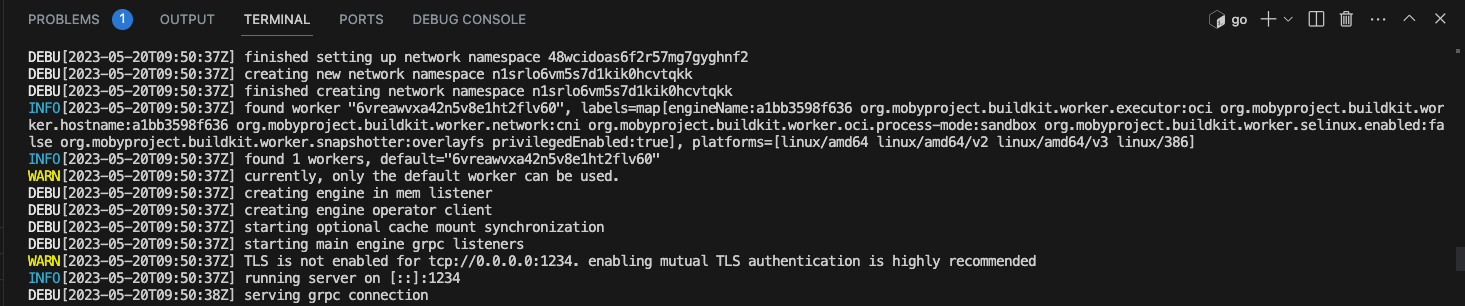
registry.dagger.io/engine:v0.5.1At this point, nerdctl will take care of pulling the engine OCI container image and spinning up the engine as a container 🎉:
Running a sample pipeline
I've defined a very basic pipeline in my fav programming language, Go. Dagger provides several SDKs to code your pipelines and connect to the engine.
I used the following example from the Dagger quickstart guide which defines a very simple pipeline: run a container from the image golang:1.19 and display the go version.
package main

import (
        "context"
        "fmt"
        "os"

        "dagger.io/dagger"
)

func main() {
        ctx := context.Background()

        // initialize Dagger client
        client, err := dagger.Connect(ctx, dagger.WithLogOutput(os.Stdout))
        if err != nil {
                panic(err)
        }
        defer client.Close()

        // use a golang:1.19 container
        // get version
        // execute
        golang := client.Container().From("golang:1.19").WithExec([]string{"go", "version"})

        version, err := golang.Stdout(ctx)
        if err != nil {
                panic(err)
        }

        // print output
        fmt.Println("Hello from Dagger and " + version)
}
main.go
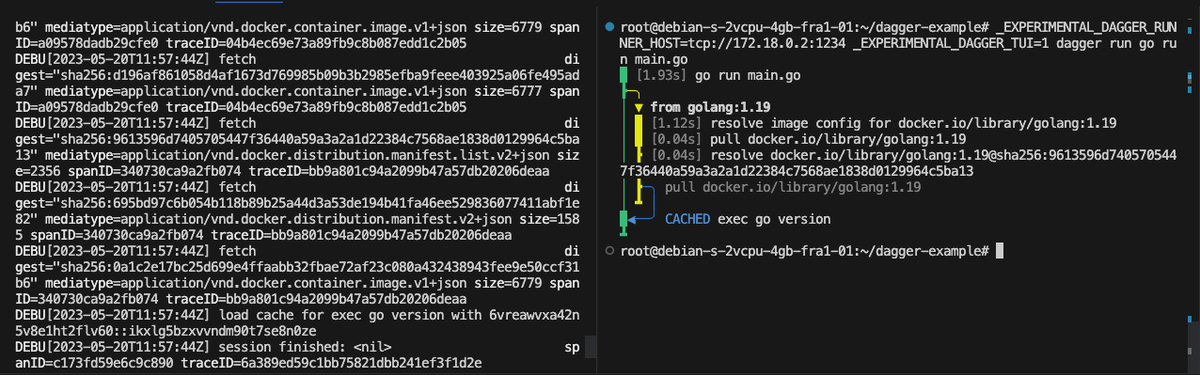
To run a Dagger CI/CD pipeline, you don't necessarily need the Dagger CLI. I could just use the go binary to run my pipeline as any other go program. Of course, I need to specify the IP address of the microVM where the engine is running:
_EXPERIMENTAL_DAGGER_RUNNER_HOST=tcp://172.18.0.2:1234 go run main.go
Bonus: Dagger provides an extremely good-looking terminal user interface (TUI) which is experimental. With the TUI you can observe in real time the progress of every stage of your pipeline, but for this, you need to invoke your pipeline through the Dagger CLI with dagger run. The CLI can be installed from the official docs as follows:
# Install the Dagger CLI
cd /usr/local
curl -L https://dl.dagger.io/dagger/install.sh | sh

_EXPERIMENTAL_DAGGER_RUNNER_HOST=tcp://172.18.0.2:1234 \
_EXPERIMENTAL_DAGGER_TUI=1 \
dagger run go run main.go
At this point, I managed to run a very simple Dagger pipeline inside a Firecracker microVM. You can see below the progress of running the pipeline with the TUI:
Final thoughts
Setting up a Firecracker microVM is not trivial and requires some level of technical expertise with regard to the Linux kernel configuration and building a root filesystem. I learned that the default kernel configurations of Firecracker microVMs do not come prepared for running containers. You must customize the Linux kernel by compiling some specific modules on it. Similarly, you also need to provide a custom root file system with all the tooling to run containers: containerd, runc, CNI plugins, and containerd.
In this blog post, I've shown just the bare minimum of running the Dagger engine as an OCI container image in a Firecracker microVM. As you have probably noticed, I've run the Dagger pipeline from the cloud VM instead of from my local development machine. However, you want to run your Dagger CI/CD pipelines (i.e. executing dagger run) from your local development machine because it's where you code the pipeline.
Achieving such a setup will require more work, as you'd need, for instance, to run an API in the cloud VM to orchestrate the creation, start and stop of microVMs dynamically when a dagger run operation is executed from your local machine.
Finally, I'd like to deeply thank the Dagger team for being so kind, fast, and willing to help in their Discord channel, in special to Solomon, Marcos, and Erik. Also, to Ivan Velichko and Hugo Santos for their help in guiding me in the right direction.